


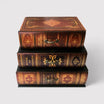


Transferring a photo to wood is much easier than you think. If you love DIY and creative recycling, you should already know that there are countless ways to reuse wooden crates and transform them into decorative items. But today we want to share a truly original decoupage technique for transferring photos onto wood and creating a small homemade work of art!
Whether you're printing your favorite photos or a drawing, wood printing allows you to create rustic, affordable, yet striking decorations. Not only that, these creations also make excellent gift ideas for a variety of occasions! An anniversary, a birthday, Valentine's Day...a truly original gift for someone special!
What do you need to transfer your photos to wood? Here's what you need!
To transfer photos to wood, you'll need very few tools and some craft supplies. If you already know how to decoupage wood, you're probably familiar with these products, but don't worry: you can find everything you need at a regular supermarket or craft store.
Here's what you need to transfer images to wood:
- sandpaper (or an electric sander)
- white paint
- vinyl glue
- sponge, spatula, and paintbrush
- ...and of course, an old wooden box! Oh, and remember, our online store also offers a line of wooden boxes for you to try your hand at creative recycling and perfect for decorating your home!
How to Transfer Photos to Wood: Stefania Martini's Guide
We decided to ask an expert in the field to give us a tutorial on how to transfer photos to wood. This five-step guide was written by our friend Stefania "Fania_Heartmade": follow her on Instagram and be inspired by her creations!
With this technique, you can also print photos on wood or decorate a box with writing. This process is the basis for many other creative DIY ideas!
But now let's turn to Stefania, who will explain how to transfer images to wood!
1. Sand the surface of the box before transferring a photo to the wood
First, you need to sand the wooden surface you've chosen to transfer a photo or drawing to. Use some sandpaper to remove any slats or imperfections in the wood. A sander will make it even quicker!
2. Print the photo you want to transfer onto the box in mirror quality!
Print your photo or image in the desired size, mirror-quality, on regular paper (not photographic paper). Mirror printing is essential, especially if the image you've chosen contains writing, because it will be used upside down. Caution! It's important to use a laser printer or a professional photocopier from a copy shop, as inkjet printers are not suitable for this type of work.
A tip: if you want the colors to remain as faithful as possible to the original photo, paint the wood surface white.
3. Apply glue to the box and arrange the photo to be transferred onto the wood.
Start preparing the wood surface! Apply a generous layer of craft glue to the front of the box (plain PVA glue will also work fine) and arrange the sheet of paper with the photo or image to be transferred in the desired position.
Prevent the sheet from sticking to the wood using a spatula or a plastic card, and let the surface dry completely.
4. Start transferring the photo to the box by wetting the sheet!
Take a bowl of water and, using a sponge, begin to completely wet the sheet. Remove the various layers of paper that will begin to peel off the wooden box (be careful: be extremely gentle!), leaving only the image. At this stage, it's essential to be patient and not forcefully peel the paper off. If necessary, repeat the wetting process after the surface has dried, and don't rub the paper too wet: you risk ruining the photo!
5. Apply a layer of vinyl glue to polish and protect the surface!
Once this step is complete, finish by applying a layer of vinyl glue to the surface of the box for a shiny and protective effect.
And voilà: you've transferred a photo to wood and created a perfect box to decorate your home or give as a gift to a loved one!
